
Project-specific wet-room guidance: This article is general planning information, not an installation specification or a guarantee against leaks, mold or slips. Legacy dimensions, airflow figures, slope examples, ratings and maintenance intervals are unverified illustrations, not universal requirements. Waterproofing coverage, drain capacity, substrate and structural changes, ventilation, electrical protection, access clearances, permits and inspections depend on the property, selected manufacturer’s instructions and the jurisdiction’s adopted code as administered by the local building authority. Confirm the assembly with qualified trades and any structural changes with an engineer; product and workmanship warranty terms vary.
A wet room bathroom is designed as a waterproofed, level-access space where the shower area has no tray or curb and the floor slopes toward drainage. It can suit small bathrooms, aging-in-place layouts and spa-style primary bathrooms, but feasibility depends on the structure, waterproofing system, drainage, ventilation and access needs.
TL;DR:
- Proper waterproofing, precise floor slope, and adequate ventilation are important for managing water and humidity; they do not eliminate leaks or mold risk.
- A wall-positioned linear drain can simplify the slope and tiling layout; the required fall depends on the drain system, manufacturer instructions and locally adopted code.
- Moisture-tolerant fixtures, flooring rated for the intended wet use and properly detailed plumbing connections help manage wear and slip risk; no tile is slip-proof.
- Costs can be higher than standard showers due to full-room tanking, possible structural adjustments and ventilation needs.
- Incomplete tanking and inaccessible drains can cause problems, emphasizing the importance of qualified installation and service access.
What is a wet room and how does it differ from a walk-in shower?
A wet room removes the step, tray and threshold that separate a traditional shower from the rest of the bathroom. Its floor is sloped toward drainage and detailed with a compatible waterproofing system. A walk-in shower may instead use a tray or contained wet zone; its waterproofing extent depends on the assembly and splash exposure.
- Level-access floors remove a curb but do not eliminate slip or trip hazards or establish wheelchair accessibility.
- Wall-positioned linear drains can pair with a single-plane fall; center drains generally need slopes from multiple directions.
- A walk-in shower remains the better choice when the bathroom cannot support a lowered subfloor or when budget rules out full-room tanking.
Homeowners weighing accessibility can discuss clearances, support needs and entry details as part of bathroom remodeling before deciding how far to take the wet room concept.
Waterproofing, floor gradient and substrate choices that matter
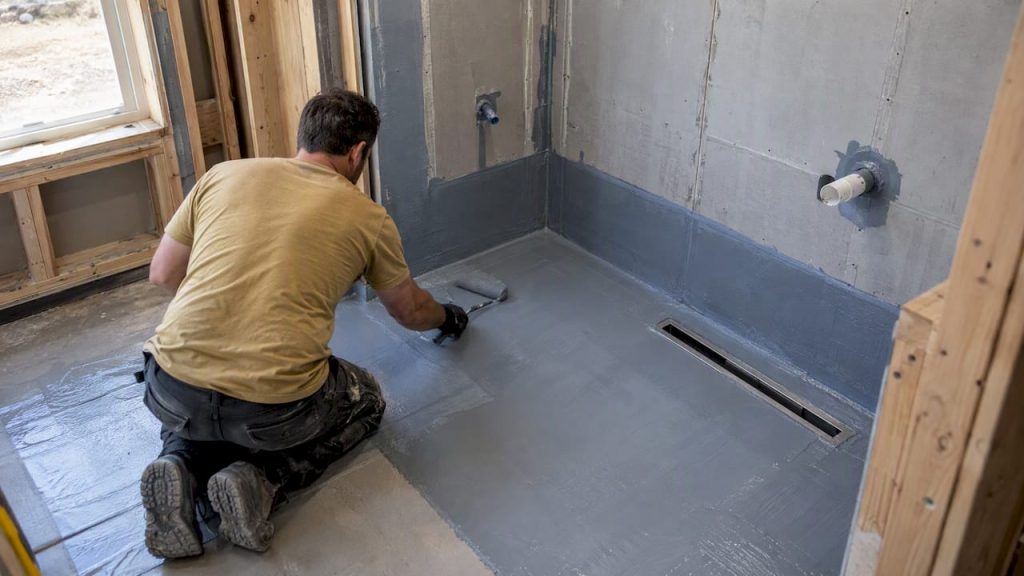
The membrane is a critical part of the assembly. A wet room needs a continuous waterproofing system with coverage, wall upturns, corners and penetrations detailed to the selected manufacturer’s instructions and applicable locally adopted code. Use compatible collars, tapes and sealants where specified rather than relying on silicone alone. Sika’s system guidance applies to its specified assembly, not every product. Backer boards, including cementitious or moisture-resistant products, must be approved for the particular wet-area assembly; board alone is not a substitute for waterproofing.
Floor slope must suit the selected drain and waterproofing assembly. The original article cited a third-party fall of 10 to 20 millimeters per meter; this is an unverified legacy design example, not a universal requirement. Confirm slope against manufacturer instructions and the jurisdiction’s adopted code with the local building authority. A single-plane fall can simplify tiling where the layout permits, as discussed in Self-Build’s design guidance.
Substrate strategy depends on what is underneath. Concrete screed handles the fall with a traditional mortar bed, while timber floors often call for a pre-formed tray or engineered build-up rather than trying to cut a fall into joists. Any change to joist depth or span should go through a structural engineer first. Whichever drain type you choose, confirm it has an accessible cover or trap for servicing, since inaccessible components can make servicing more invasive.
Ventilation and moisture control you can measure
Wet rooms increase the area exposed to water, so ventilation needs should be assessed for the room and its use. Exhaust should discharge outdoors as required by the locally adopted code. The original article cited BASC guidance referring to 50 CFM intermittent or 20 CFM continuous exhaust under ASHRAE 62.2 and IRC provisions. These are unverified legacy references, not universal wet-room requirements; confirm the applicable code edition, sizing and installed airflow with the local building authority and ventilation professional.
- Route and seal ducting to the fan manufacturer’s instructions and applicable adopted code.
- Choose a low-sone fan controlled by a timer or humidity sensor rather than a simple wall switch.
- Set post-shower fan operation to suit manufacturer guidance, measured humidity and the ventilation design rather than a fixed runtime.
Underfloor heating may help tile dry, but it does not replace drainage, waterproofing or ventilation and does not prevent mold. Any electric heating system must be listed for the intended wet-area assembly and installed with the protection, placement and controls required by manufacturer instructions and the locally adopted electrical code. Coordinate electrical work with a qualified electrician. If included in broader interior remodeling, assess floor build-up and connected room transitions together.
Benefits and drawbacks you should weigh before committing
Wet rooms solve real problems, but they are not the right answer for every bathroom.
- Step-free access can help people using walkers or wheelchairs, but safe usability also depends on clearances, turning space, controls, supports and individual needs. Curbless design alone does not establish ADA compliance.
- A curbless, glass-light layout reads larger than a boxed-in shower, which matters most in small bathrooms.
- A continuous floor can simplify cleaning around a tray lip, though tile, grout, drains and seals still need care.
- Technical costs can exceed a standard shower installation because a larger area may need tanking and slope work.
- Splash can reach surfaces beyond the shower, so cabinetry, toilets and vanities near the wet zone need materials and details suited to that exposure.
- Whether to retain a conventional tub elsewhere depends on household needs and local buyer preferences; a wet room does not guarantee a resale benefit.
Watch for red flags during installation: waterproofing that stops short of the specified coverage, a drain with no service access or ventilation that has not been sized for the room. These warrant review before finishes conceal the work; they do not by themselves establish a diagnosis.
Design and layout rules for small and large wet rooms
Dimensions drive almost every other decision. The original article suggested a 900 by 900 millimeter shower zone and approximately 2,100 millimeters of ceiling height. These are unverified legacy design examples, not minimum code or accessibility requirements. Confirm clearances, height and access needs with the designer and local building authority under the applicable adopted code.
- Consider a wall-positioned linear drain where the layout and specified system support a single-plane fall.
- Compare center and linear drains for the available floor build-up, tile size and slope geometry; neither is universally best.
- Use a half panel or fixed glass screen to contain splash without boxing in the room the way a frameless enclosure does.
- Choose wall-hung sinks and toilets where floor space is tight, since they free up sightlines and make cleaning the floor easier.
Pro Tip: In a small bathroom, coordinate drain location, floor structure and splash control before finalizing the layout.
Larger wet rooms offer more layout options, but drain placement still needs to coordinate with slope, structure and access. Curbless entries also need careful transition and splash-control details.
Materials and finishes built to handle constant wetting
Tile choice affects safety and installation cost. Smaller-format tile can follow multi-directional slopes more readily than large-format tile, but grout lines alone do not establish slip resistance. The original article suggested R10 to R12 ratings; these are unverified legacy selection examples, not universal wet-room criteria. Ask the designer and supplier for test data appropriate to wet barefoot use and any applicable local requirements. Epoxy grout may offer stain and moisture resistance depending on the product, but it does not replace a waterproofing membrane.
Drain hardware is a finish decision as well as a technical one. Tile-in linear drains may offer removable access, but confirm flow capacity, cleaning access and compatibility with the waterproofing system. Use a backer approved for the specified assembly. Coordinate any underfloor heating before finishes, including its wet-area listing and electrical requirements.
For bathroom doors, select materials suited to expected humidity and splash exposure, and coordinate swing clearance near the wet zone.
Cost and budgeting: what should be in your contractor’s quote
Wet room costs vary widely depending on location, substrate condition and finish level, and retrofit work over timber floors or below-grade slabs can add cost where structural, drainage or waterproofing changes are needed. Before comparing quotes, make sure each one spells out the same scope.
- Tanking system and product specification, including how far the membrane extends past the wet zone.
- Drain type, linear or center, and whether the cover is serviceable.
- Substrate work required, including any subfloor leveling or structural modification.
- Ventilation specification, including fan CFM rating and duct routing.
- Any offered warranty terms, including waterproofing workmanship coverage, exclusions, maintenance duties and claim procedures; distinguish workmanship coverage from product warranties.
For a comparison point, review the scope considerations in our bathroom remodel cost guide; any published figures are planning references, not a project quote.
Planning your build: permits, contractors and structural checks
A structural engineer should be part of the conversation whenever a timber subfloor needs to drop for a fall, or when any load-bearing element changes. Ask the engineer directly about joist span, the proposed floor build-up thickness and whether blocking or sistering is needed before tile goes down.
When interviewing contractors, ask for the exact waterproofing system, installation sequence and any specified testing or inspection stages before tile covers the membrane. Request written details of any offered workmanship and product warranties, including limitations; coverage is not automatic. Permit and inspection requirements depend on scope and the jurisdiction’s adopted code, so confirm them with the local building authority before work begins. A project commonly moves from survey and design through any required permitting, rough-in, membrane installation and required testing or inspection, then tile and fixtures. Timing depends on scope, approvals, material availability and site conditions.
Maintenance and the warning signs to watch for
A wet room needs routine care. The original article suggested wiping glass and tile weekly, clearing drains monthly and checking grout and seals twice a year; these are unverified legacy maintenance intervals, not a product-specific schedule. Follow the installed products’ cleaning and inspection instructions. Persistent pooling or musty odors may reflect drainage, ventilation, seal or other problems and warrant professional assessment rather than an assumed caulk repair. Ventilation and suitable heating can support drying but do not eliminate membrane deterioration, mold risk or maintenance.
How to scope a wet room project
Treat a wet room as a waterproofing and drainage project as well as a design project. Ask for the floor layout, drain location, waterproofing specification, required inspection or testing points and any offered warranty terms in writing.
Ready to plan your wet room remodel?
To discuss a wet room as part of bathroom remodeling, review your existing floor, access goals, drainage and finish preferences with the project team. When you are ready, request a quote based on your space and proposed scope.
FAQ
What is the downside of a wet room?
The main downside is cost and complexity: a wet room needs coordinated waterproofing, slope and ventilation, which can cost more than a standard shower tray installation. Splash exposure also calls for suitable materials and details beyond the shower area.
Is a wet room bathroom a good idea?
A wet room can suit small bathrooms, aging-in-place goals or a spa-style primary bathroom if the structure, access clearances, drainage, waterproofing and ventilation support the design. It works less well when necessary floor changes are impractical or the budget cannot cover the full scope.
Can you put a toilet in a wet room?
A toilet may be included in a wet room if the layout, fixture installation and required clearances comply with the locally adopted code. Keep it out of direct spray where practical and use details suited to the exposure. Wall-hung toilets can simplify floor cleaning but require suitable structural support.
Is a wet room cheaper than a bathroom?
A wet room is typically not cheaper than a standard bathroom to install, since waterproofing the entire floor and achieving the correct slope costs more in labor and materials than tanking a single shower tray. Retrofit projects over timber floors or below-grade slabs add further cost on top of that baseline.